Setting Windows File Associations in Wine
May 22, 2012 Reading time: 3 minutes See Comments
 Wine Association Creator
When running an application in Wine recently I noticed that if my application wanted to open a Word document or Excel spreadsheet it failed because Office isn't installed in Wine, even though I had LibreOffice installed natively in Linux. The same goes for PDF documents which fail because I don't have Adobe Reader Installed, I have Okular already installed in Linux.
When searching the net for a solution all I came across were registry edits and a couple of command line scripts. So I decided to write a simple application in Qt/C++ to make the process easier.
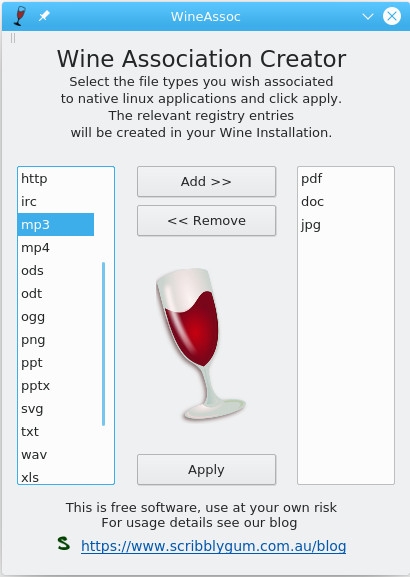
After downloading wineassoc simply double click on the file (you may need to make it executable first, right click and change file permissions) or from a console run ./wineassoc in the directory you downloaded into. From console you can make the file executable using "chmod u+x wineassoc". You will be presented with a window as shown here in the screenshot. Simply select which file extensions you wish to associate to native Linux applications and then click Add >> to move them to the right hand column. When you have selected all the required types, click Apply. Note that wineassoc honours the WINEPREFIX setting and will prompt for confirmation before proceeding.
The extension list is populated using Linux config files, with a few extras added in. If by chance your extension is not shown you can start wineassoc from the console specifying extra extensions manually. For example ./wineassoc abc def would add 'abc' & 'def' to the association list. You can also hover your mouse over an extension type to show what programs are associated to that type.
The program should run on most Linux systems that have Qt 4.8 Qt 5 or later. Please let me know if you have problems with a particular distro and Ill try to look into it. This version has been tested with Wine 4.0.3 & Wine 6.0 and was built using Qt5.
Download wineassoc using the link below:
Find this utility useful? Leave a comment or consider a purchase from our website.
 WineAssoc is licensed under a Creative Commons Attribution-NonCommercial-NoDerivs 3.0 Unported License.
See Comments
TRS-80 Emulator for Linux
January 27, 2009 Reading time: 3 minutes See Comments
 I got a little nostalgic when my son started writing a game in Fenix that looked a lot like Robot Attack (Even though he's never seen it). So I thought I'd show him the original, but rather than try and setup the old System 80 (TRS-80 clone from DSE) I decided to use an emulator.
I've used Tim Manns excellent TRS-80 emulator xtrs before which I remember worked well. Unfortunately when trying this now it seems that Linux has evolved a fair bit and as a result I noticed a few issues when running xtrs.
- xtrs would not work on my new distro without removing the -DHAVE_SIGIO from the makefile. (See Tims page for details on this).
- Sound on xtrs would not work unless I stopped or removed the pulseaudio process.
- To allow -autodelay to work on xtrs I had to remove the optimizations from the compiler (-O0).
- Keyboard input tends to be flakey on newer distros also.
After a little research I came across sdltrs which is based on xtrs. The benefit of using the sdl version is that it works around the problems associated with new linux distros. Many thanks to Mark Grebe for his work on this.
So here's a summary of what I did to get sdltrs running:
- Download the tarball from the Browse SVN under the Code menu
- Extract the tarball tar zxvf src.tar.gz
- cd src, cd linux, make
- this will create a sdltrs binary file, you just need to execute this, enter ./sdltrs
- I created a new directory with sdltrs, the level2.rom file and various disk files.
- Once sdltrs has booted the level2.rom press F7 for configuration options.
- Put a disk operating system into the Disk 1 slot (ie NEWDOS 80)
- Press F10 to reset the system and it should boot the disk.
- For those a little rusty like me try DIR :0 to show contents of disk 1 and DIR :1 for disk 2.
Works Great :)